# Live Streaming
# Getting Started
# Creating an Account
- Sign up for an account on joystick.tv.
- Check for the confirmation email we sent you. (You may need to search your email for “joystick”. Some emails end up in boxes other than inbox/spam/junk, etc…)
- Log in and you’re ready to explore.
# Becoming a Streamer
- After you confirm your email, you may apply to be a streamer. From the website on a desktop, click “More” from the main menu on the left. From mobile, click the profile icon on the bottom right.
- Find and click the large red box to begin your streamer verification. If you can not find the box, you can go directly to https://joystick.tv/stream-approvals/new.
# ID Verification
Requirements: To verify that you are 18 years of age or older, and that you are who you say you are, you’ll need a valid government-issued ID card or passport.
You must upload three photos:
- The front of your government issued ID (or inside of passport).
- The back of your government issued ID (or outside of passport).
- A picture of you holding your ID, and a piece of paper with joystick.tv/u/YOURUSERNAME on it in your handwriting. Make sure that your face is clearly visible.
The government issued ID must include a birthdate, photo of your face, and expiration date.
We understand that some IDs do not expire, and we take this into consideration
Approval Tips:
- All images must be clear, and high resolution.
- Your ID must be fully in frame.
- Must be in color.
- Text must be clearly visible, and easily readable.
- Background must be minimal.
- Image should not be edited, resized, or rotated.
- File must be .png or .jpg
- Must be under 15MB in size.
- ID must be valid and not expired.
- Passports should have the inside taken for the “Front”, and outside for “Back”.
# Streaming Software
For the best streaming experience, we recommend using dedicated streaming software.
However, you can stream directly from your desktop browser, or mobile browser with fewer steps.
Streaming software gives you full control over your broadcast - letting you customize what’s shown on screen, such as multiple video sources, overlays, managing audio sources, and more.
We recommend using OBS; however, you may use any streaming software that allows you to stream RTMP.
Here are a few examples of other streaming software.
- StreamLabs - https://streamlabs.com/
- XSplit - https://www.xsplit.com/
- SplitCam - https://splitcam.com/
- Larix - https://softvelum.com/larix/
- OBS - https://obsproject.com/
# Connecting to joystick.tv
Connecting to Joystick is pretty simple, your streaming software will ask for two pieces of information:
Server URLStream Key
You can find these in your Stream Settings page - keep it open while you set up your stream.
⚠️ The Stream Key is your password to connect to joystick, so be sure to keep this private. ⚠️
- While on your Stream Settings page, select the server closest to you from the “Server Selection” dropdown menu, and copy the
Server URL. - Open the settings for your streaming software. For OBS, go to the “Stream” tab under “Settings”.
- In your streaming software, search for “Joystick.TV” in the service list.
- (Optional) If you’re in Europe/Asia, or Joystick.TV is not listed, select “Custom” and enter the
Server URLyou copied earlier. - Next copy your
Stream Keyfrom your Stream Settings page. - Paste this value into the Stream Key field in your software.
Note: Joystick has not yet been integrated into all streaming software. If you do not see us listed, use the “Custom” option.
That’s it! You’re now ready to go live and test your stream. You may need to change your default settings as some software assumes you want to stream the absolute maximum video quality, and that can lead to issues.
Below we will go over some guides on configuring OBS. For the most part, these settings will work similar on other streaming software, but you may need to find additional guides online for configuring your software.
# Streaming Setup Guides
If you’re looking to get set up quick with minimal effort, we recommend starting with Basic Setup settings guide for OBS (or your streaming software). Fine-tuning your settings can take quite a bit, and may be daunting at times. Once your stream looks crisp, you can come back and try some more advanced settings for even better performance.
Avoid using the “OBS Configuration Wizard”. Using it can lead to poor stream quality, negatively impacting your audience and monetization. Follow these steps instead:
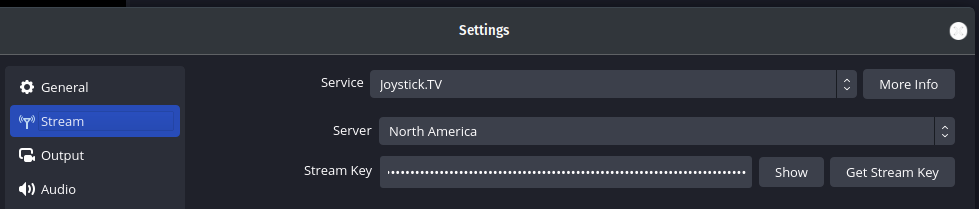
# 1. Stream Settings
- Open OBS settings and go to the “Stream” tab.
- Select
Joystick.TVas the service. - Choose the server region nearest to your location.
- Your stream key is located in your Joystick Stream Settings.
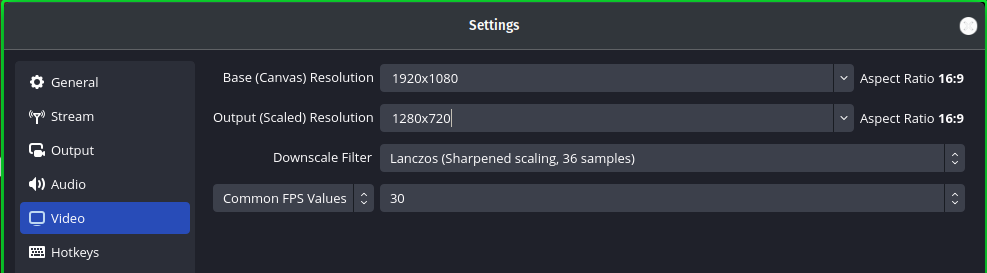
# 2. Video Settings
- Select the “Video” tab.
- Set Base (Canvas) Resolution to your monitor’s screen size.
- Set Output (Scaled) Resolution to 1280x720.
- Set Downscale Filter to Lanczos.
- Set Common FPS Values to 30.
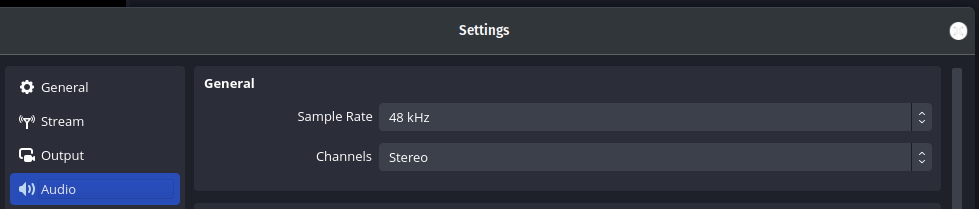
# 3. Audio Settings
- Select the “Audio” tab.
- Set Sample Rate to 48 kHz.
- Set Channels to Stereo.
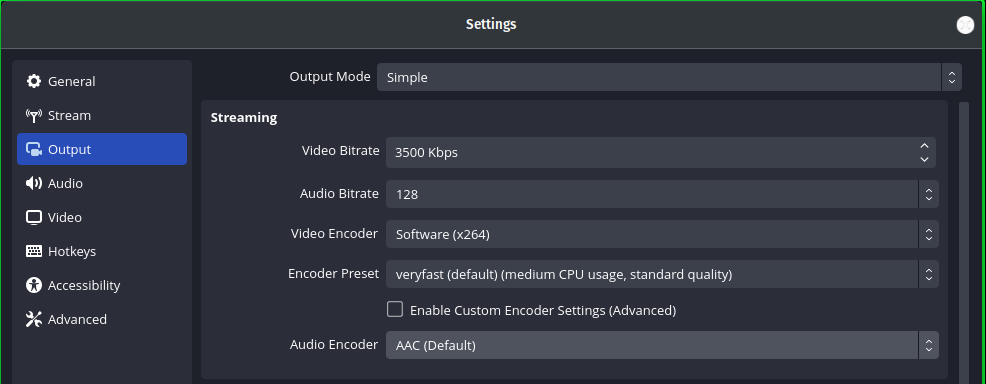
# 4. Output Settings
- Select the “Output” tab.
- Set Output Mode to Simple.
- Set Video Bitrate to 3500 kbps.
- Set Audio Bitrate to 128 kbps.
- Set Video Encoder to Software (x264).
- Set Encoder Preset to veryfast.
No further adjustments are needed to go live with your first stream. If you’re comfortable tweaking settings, continue to the Custom Setup section.
If you have any issues, refer to our Troubleshooting Guide or join our Discord for support.
OBS is an advanced software, and incorrect settings can drastically impact stream quality. If you’re unfamiliar with these options, start with the Basic Setup before making adjustments.
# Step 1: Gather Information
- Find the maximum resolution of your camera.
- Visit Cloudflare Speedtest and record your upload speed.
- Identify the streaming software you’re using (e.g., OBS, Lovense StreamMaster).
- Confirm your operating system (e.g., Windows 11, macOS).
Use your camera’s max resolution and internet upload speed to determine the best settings. Avoid selecting higher settings than your system can handle.
# Step 2: Output Settings
- Select the “Output” tab.
- Set Output Mode to Advanced.
- Set Audio Codec to AAC.
- Choose the appropriate video encoding method:
- If you have a powerful GPU, use Hardware Encoding.
- If unsure, start with Software Encoding.
# Software Encoding (x264)
Best for: Older PCs, CPU-heavy tasks (e.g., gaming while streaming). Software encoding relies on your CPU for video processing.
| Resolution | 853x480 | 1280x720 | 1920x1080 | 2560x1440 | 3840x2160 |
|---|---|---|---|---|---|
| Upload Speed (Mbps) | 5 | 10 | 15 | 20 | 25 |
| Video Bitrate (Kbps) | 2500 | 4000-5000 | 6000-8500 | 8500 | 8500 |
| Audio Bitrate (Kbps) | 128 | 128 | 192 | 192 | 256 |
| Rate Control | CBR | CBR | CBR | CBR | CBR |
| Framerate (FPS) | 30-60 | 30-60 | 30-60 | 30-60 | 30-60 |
| Keyframe Interval | 2s | 2s | 2s | 2s | 2s |
| Preset | veryfast-medium | veryfast-medium | fast-medium | fast-medium | fast-medium |
| Profile | Main/High | Main/High | High | High | High |
| Tune | None | None | None | None | None |
# Hardware Encoding (NVIDIA NVENC, AMD AVC)
Best for: High-end GPUs, maximizing CPU performance. Hardware encoding shifts the workload to your GPU, improving overall system efficiency.
| Resolution | 853x480 | 1280x720 | 1920x1080 | 2560x1440 | 3840x2160 |
|---|---|---|---|---|---|
| Upload Speed (Mbps) | 5 | 10 | 15 | 20 | 25 |
| Video Bitrate (Kbps) | 2500 | 4000-5000 | 6000-8500 | 8500 | 8500 |
| Audio Bitrate (Kbps) | 128 | 128 | 192 | 192 | 256 |
| Rate Control | CBR | CBR | CBR | CBR | CBR |
| Framerate (FPS) | 30-60 | 30-60 | 30-60 | 30-60 | 30-60 |
| Keyframe Interval | 2s | 2s | 2s | 2s | 2s |
| Preset | Quality | Quality | Quality | Quality | Quality |
| B-frames | 2 | 2 | 2 | 2 | 2 |
If you need help, check our Troubleshooting Guide or join our Discord.
Streaming Optimization & Key Considerations
Streaming from your PC can be intensive, and many factors affect the quality of your stream, including:
- CPU, GPU, and RAM performance
- Internet upload speeds
- Encoder efficiency
- OBS settings
- WiFi vs. Ethernet
- Network stability and router performance
This guide will help you optimize your stream and avoid common issues.
Scene Complexity & Bitrate Correlation
Not all content compresses the same way. More movement = more bitrate required.
- Simple scenes (e.g., talking head, static background) require a lower bitrate.
- Fast-motion scenes (e.g., FPS games, action-heavy streams) require a higher bitrate.
If your scene complexity is high but your bitrate is too low, compression artifacts will appear.
CPU, GPU, and RAM Considerations
Streaming requires real-time video encoding, which is CPU or GPU intensive.
- CPU-based encoding (x264): Uses more CPU, better quality at low bitrates.
- GPU-based encoding (NVENC, QuickSync, AMD HW): Uses GPU, better for high-action streams.
- More applications = more resources used.
- If running OBS + game + Discord + camera → Expect performance strain.
- If also recording while streaming, expect additional CPU/GPU load.
💡 Tip: If live streaming is your goal, consider hardware upgrades for a smoother experience.
Internet Upload Speeds & Overhead
Streaming isn’t just about download speeds—upload speed is key.
- A 1080p 60fps stream requires significantly more upload bandwidth than a 720p 30fps stream.
- The higher the bitrate, the more bandwidth is used.
- Recommended upload speed buffer: Always leave 20-30% headroom for stability.
| Stream Resolution | Upload Speed Needed |
|---|---|
| 720p @ 30fps | 5 Mbps |
| 1080p @ 30fps | 10 Mbps |
| 1080p @ 60fps | 15+ Mbps |
Overhead matters! Bitrate isn’t the only thing using your bandwidth.
RTMP streaming adds 5-10% additional network overhead beyond your set bitrate.
💡 Tip: If your upload speed is 10 Mbps, do not exceed 8 Mbps total bitrate.
Exceeding Maximum Allowed Bitrate (8500 Kbps)
Most streaming platforms cap bitrate.
For Joystick, the limit is 8500 Kbps.
Exceeding this will cause dropped frames, stuttering, or forced bitrate reductions.
To prevent issues:
- Keep total video + audio bitrate under 8500 Kbps.
Some platforms enforce hard bitrate caps, while others throttle quality dynamically—check platform guidelines.
Encoder Performance (Software vs. Hardware)
Encoding is one of the most demanding tasks during streaming.
- x264 (CPU encoding) → Higher quality at lower bitrates but very CPU-intensive.
- NVENC, QuickSync, AMD HW (AVC) → Offloads encoding to GPU, better for fast-motion streams.
- If using x264, start with the “veryfast” preset and adjust for balance between quality and performance.
💡 Tip: CPU-bound streamers should use a strong CPU with sufficient cooling.
💡 Tip: GPU-bound streamers should have a high-end GPU with sufficient VRAM.
WiFi vs. Ethernet & Network Optimization
Your home network plays a large role in streaming stability.
- Use Ethernet instead of WiFi whenever possible.
- If on WiFi, use 5GHz over 2.4GHz for less interference.
- Prioritize streaming traffic if your router supports QoS.
- Restart your modem occasionally if you notice dropped frames.
💡 Tip: If using WiFi, keep background devices off the network to prevent bandwidth congestion.
FPS, Keyframe Interval & Motion Impact
Your FPS (frames per second) affects how smooth your stream appears.
- 30fps is easier to encode and uses less bandwidth.
- 60fps requires more bitrate but offers smoother playback.
| Scenario | Recommended FPS |
|---|---|
| Low-motion streams (static cam, just chatting, city-builders, turn-based games) | 30 FPS |
| Medium-motion (RPGs, casual shooters, moderate action) | 30-60 FPS |
| Fast-motion (FPS, racing games, high-action content) | 60 FPS |
Keyframe Interval
- Set to 2s for smoother playback.
- Higher = Buffering issues.
- Lower = Unnecessary data usage.
Network Jitter & Packet Loss
Network jitter is the variation in latency, causing choppy streams, stutters, and lag spikes.
To check for jitter:
- Look at the jitter value in your Speedtest or Bufferbloat test.
- Alternatively, use PingPlotter (Free trial).
✅ Good Jitter: Under 10-15 ms
❌ Bad Jitter: Higher than 20 ms
Reducing Jitter & Packet Loss
- Use wired Ethernet instead of WiFi.
- Restart your router/modem to refresh your connection.
- Check for background uploads (e.g., cloud sync, Windows updates).
- Contact your ISP if packet loss exceeds 10%.
Final Tips for Beginners & Intermediate Streamers
Start with conservative settings and adjust as needed.
Monitor stream health (OBS stats, dropped frames, bitrate stability).
Use test streams to tweak settings before going live.
Check your ISP’s policies on bandwidth throttling.
Join our Discord there are plenty of knowledgeable people that can give recommendations.
If you don’t want to setup software right away, you can go live directly from your browser — no downloads needed.
On Desktop:
- Go to your Publisher View.
- Click the button Use Your Webcam.
- if your browser asks for permission to use your Webcam and Microphone, select allow.
- You’ll see a live preview — you are not live just yet.
- Once everything looks good, click the Play button (▶) to start your stream.
Note: You can also screenshare by clicking the Monitor icon.
This is the simplest way to start streaming from your PC.
Multistreaming Considerations
These settings assume you are only streaming to Joystick, for multistreaming, increase your upload speed accordingly.
Example:
- Streaming at 1080p@60 to Joystick + 2 other platforms requires a minimum of 30 Mbps upload (~8 Mbps per site).
# Mobile Streaming
If you want to stream on the go — whether from your backyard, kitchen, or anywhere else — you’ll need a mobile streaming app. While OBS is available for desktops and laptops, there’s currently no official OBS app for iOS or Android. There are a few apps, but the main thing to look for is “Custom RTMP Stream”. As long as the app can publish an RTMP stream, you can use it to stream to Joystick from your mobile device.
Streamslabs has a desktop app that you may already be familiar with. You can download this app from your app store, then once installed, follow these steps.
Find the menu button. This is located in the upper left corner, and may be a little tricky to see at first if your camera is active. Once in the settings menu, tap on the “Account Settings”.
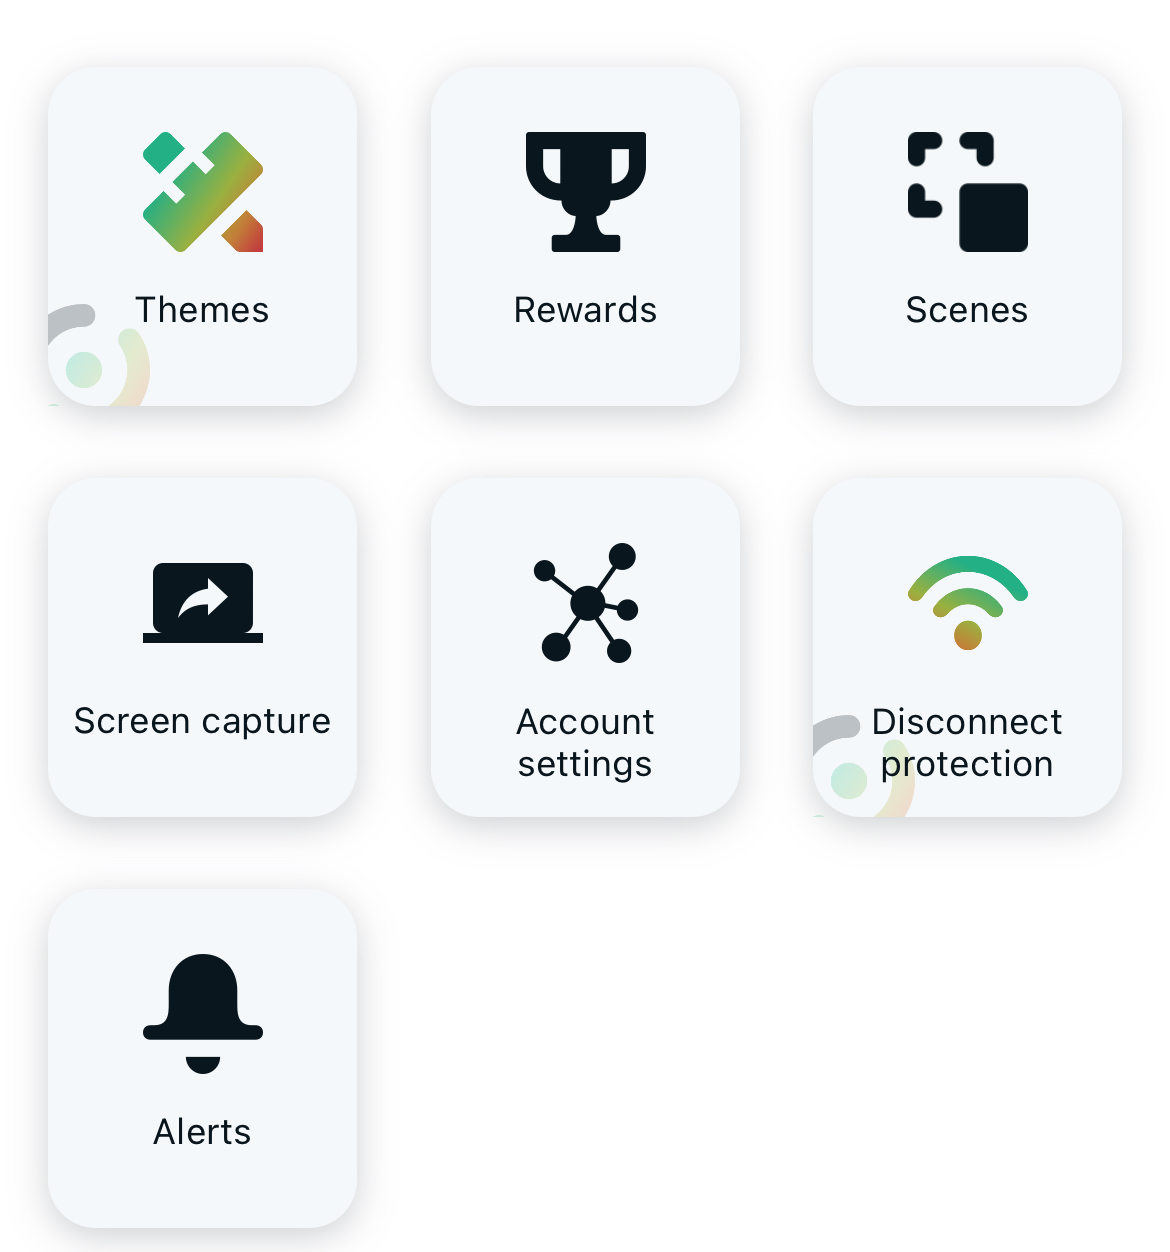
On the next screen, you’re presented with several streaming services that have been pre-built into Streamlabs. Unfortunately, Joystick is not one of those.
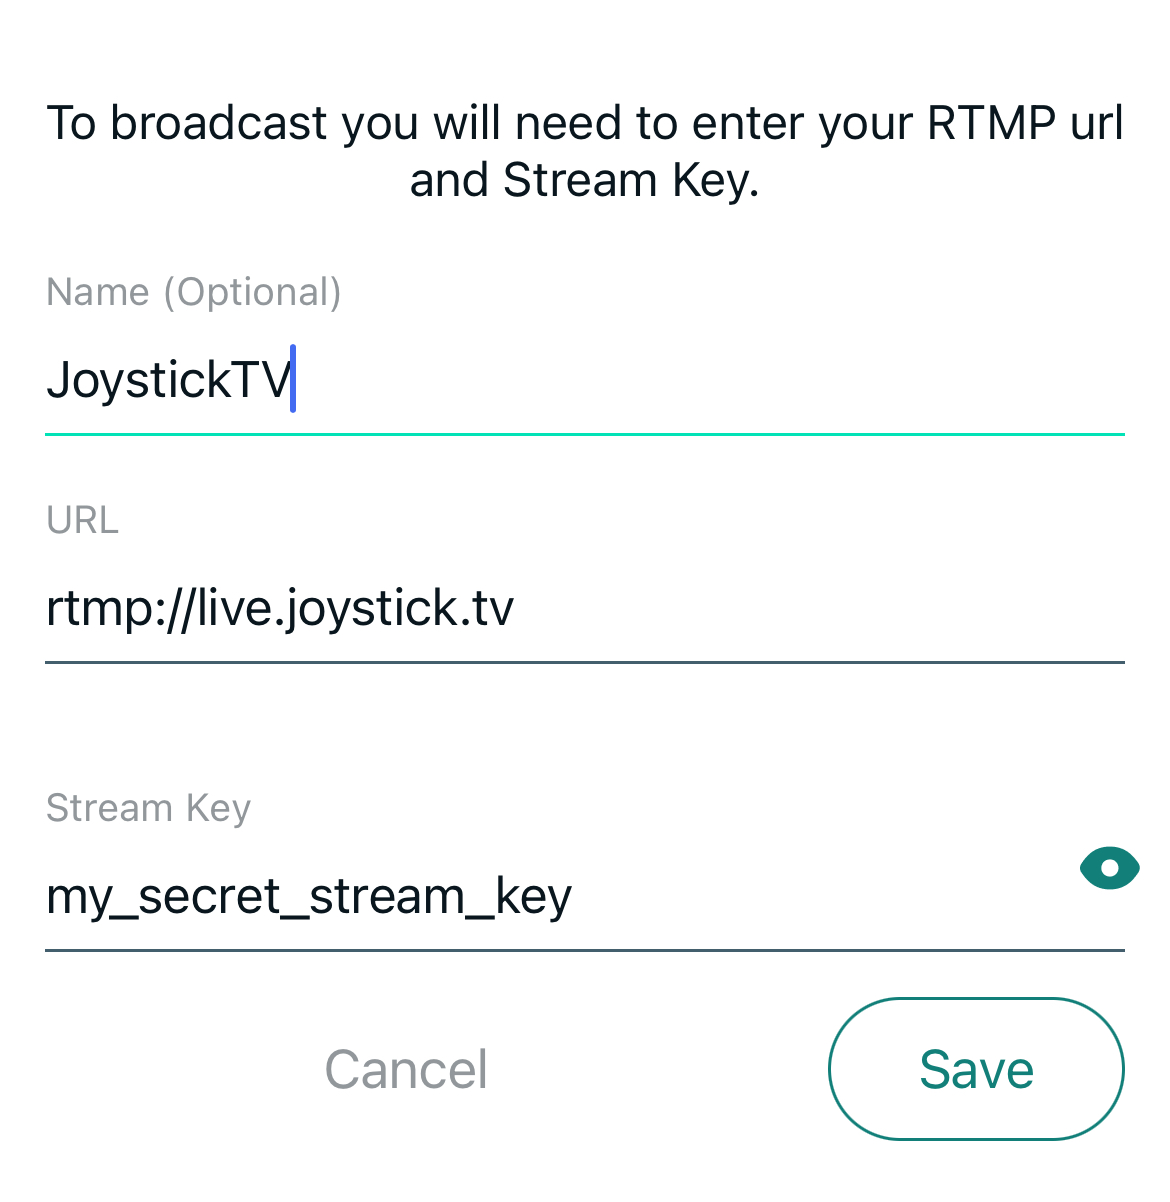
Find the “Custom RTMP Server” setup at the bottom of this list.
On the RTMP setup screen, you will enter in a bit of information: the RTMP server and your stream key. Both of these can be found in your Joystick Stream Settings.
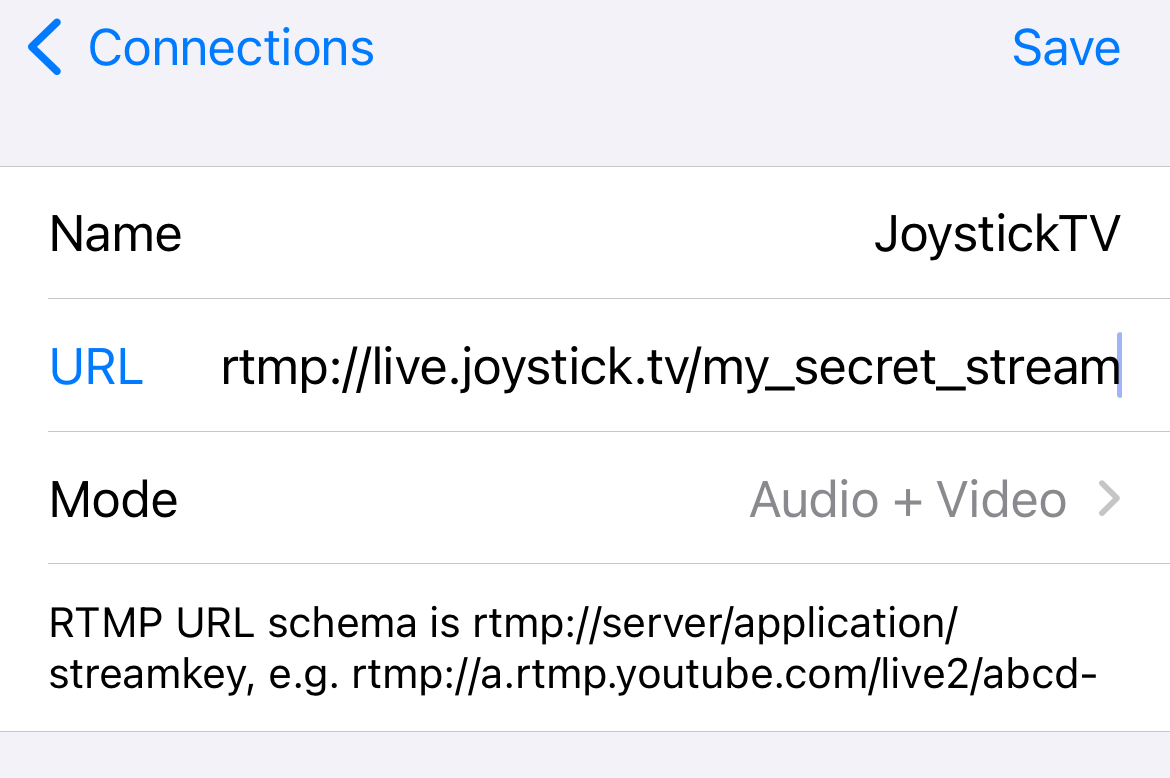
This is another great mobile app that comes with built-in overlays, and lots of fancy things. Setup is fairly easy too!

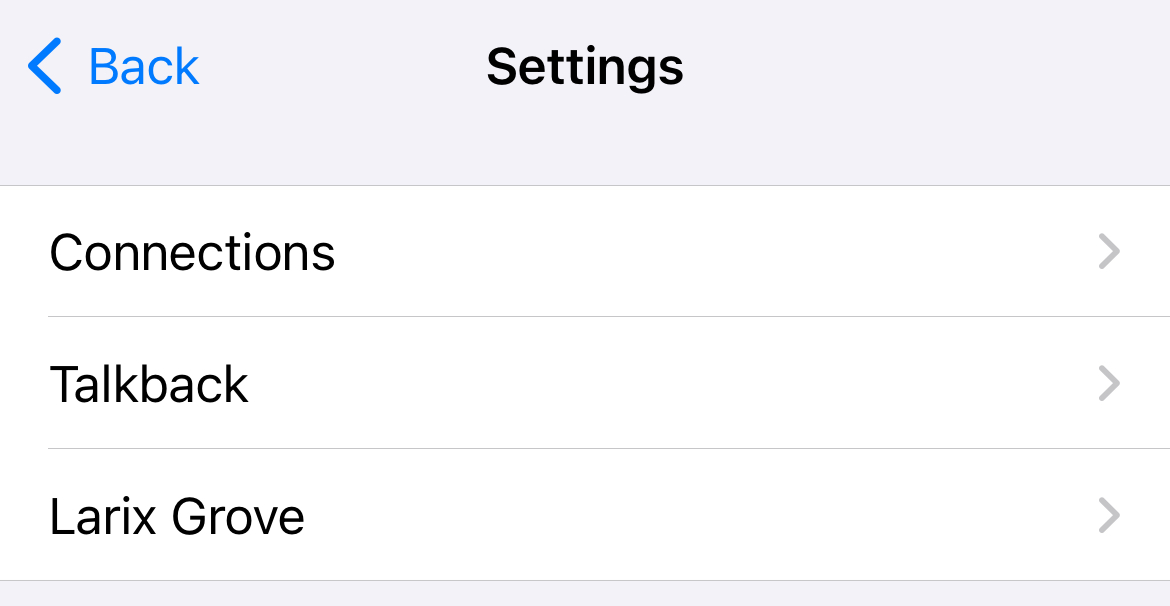
Once you’ve downloaded the app and opened it, find the settings gear icon in the bottom right. From the settings page, tap on “Connections”.
Unlike Streamlabs mobile, Larix doesn’t require a separate input field for your stream key. Instead, you will just join your server URL and stream key together as one long string.
If you don’t want to use a mobile app, you can go live directly from your browser — no downloads needed.
On mobile:
- Go to Joystick.tv, make sure you’re signed in.
- At the buttom of the screen tap the Plus Sign (
(+)) button. - Select “Start Streaming.”
- If your phone asks for permission to use your camera and microphone, tap “Allow.”
- You’ll see a live preview — you are not live just yet.
- Once everything looks good, tap the Play button (▶) to start your stream.
This is the simplest way to start streaming from your phone, especially if you’re on the go or just want a quick setup.
# Multistreaming
Multistreaming is when you stream to multiple sites at the same time. This is actually something that we encourage on Joystick as it is the best way to reach a wider audience. There are several programs that have the ability to do this, though each program also does have it’s pros and cons.
Solutions:
OBS supports multi-RTMP streaming, allowing you to broadcast to multiple platforms simultaneously without relying on third-party services.
# How to Set Up Multi-RTMP in OBS
- Download and install the OBS Multiple RTMP Output Plugin.
- Open OBS and go to Docks > Multiple RTMP Output.
- Click Add New Target, then enter the
stream keyandRTMP URLfor each platform. - Adjust bitrate and encoder settings to match the platform requirements.
- Start streaming! OBS will broadcast to all configured destinations at once.
Pros:
- No extra costs for cloud-based services.
- Complete control over your stream quality and bandwidth usage.
- Allows you to send select scenes to different platforms.
Cons:
- Requires a powerful CPU/GPU if encoding multiple streams at different resolutions/bitrates.
- Uses 1x more upload bandwidth per platform, which can cause quality issues if your internet speed is limited.
Aitum Multistream is a simpler alternative to multi-RTMP in OBS, offering an easier UI for managing multiple stream outputs.
# How to Set Up Aitum Multistream
- Download the latest release and install Aitum Multistream.
- Open OBS and go to Tools > Aitum Multistream.
- Click Add Destination, then enter the
stream keyandRTMP URLfor each platform. - Configure bitrate and resolution for each stream.
- Click the normal Start streaming button in OBS.
- Now click the “Stream” icons for each platform in the Aitum panel, which will turn green when active.
Pros:
- User-friendly interface, reducing setup complexity.
- Lower performance impact compared to OBS Multi-RTMP Plugin.
- Supports Vertical streaming.
Cons:
- Still relies on your local hardware for encoding.
- Uses 1x more upload bandwidth per platform, which can affect stream quality.
- Only the main scene is sent to all platforms.
Cloud multistreaming services handle encoding and distribution on external servers, allowing you to stream to multiple platforms without extra bandwidth usage on your end.
# Reputable Cloud Multistream Services
🚧 Note: Most mainstream multistreaming services prohibit adult content, as payment processors and financial institutions classify it as “high risk.” If you know of any services that allow it, feel free to suggest them in our discord under suggestions.
- Streamster – A straightforward cloud-based solution with a free plan, but some features require a paid subscription.
# Pros & Cons of Local vs. Cloud Multistreaming
| Feature | Local Multi-RTMP (OBS/Aitum) | Cloud Multistreaming |
|---|---|---|
| CPU Usage | High (multiple encodings) | Low (single encoding) |
| Bandwidth Use | High (multiple uploads) | Low (one upload, multiple outputs) |
| Latency | Lower (direct encoding) | Higher (server relay) |
| Costs | Free (but hardware-dependent) | Paid subscription required |
| Platform Limit | Depends on PC strength | Supports more platforms |
If you have strong upload speeds and a powerful PC, local multistreaming gives you better control.
If you have limited bandwidth or a weaker PC, cloud-based multistreaming is a better choice.
Download Stream Master from Lovense, it is a bundled software package that simplifies setting up your stream. It includes OBS and the OBS Multi-RTMP plugin for seamless multi-streaming.
# Getting Started
- Open OBS from Stream Master.
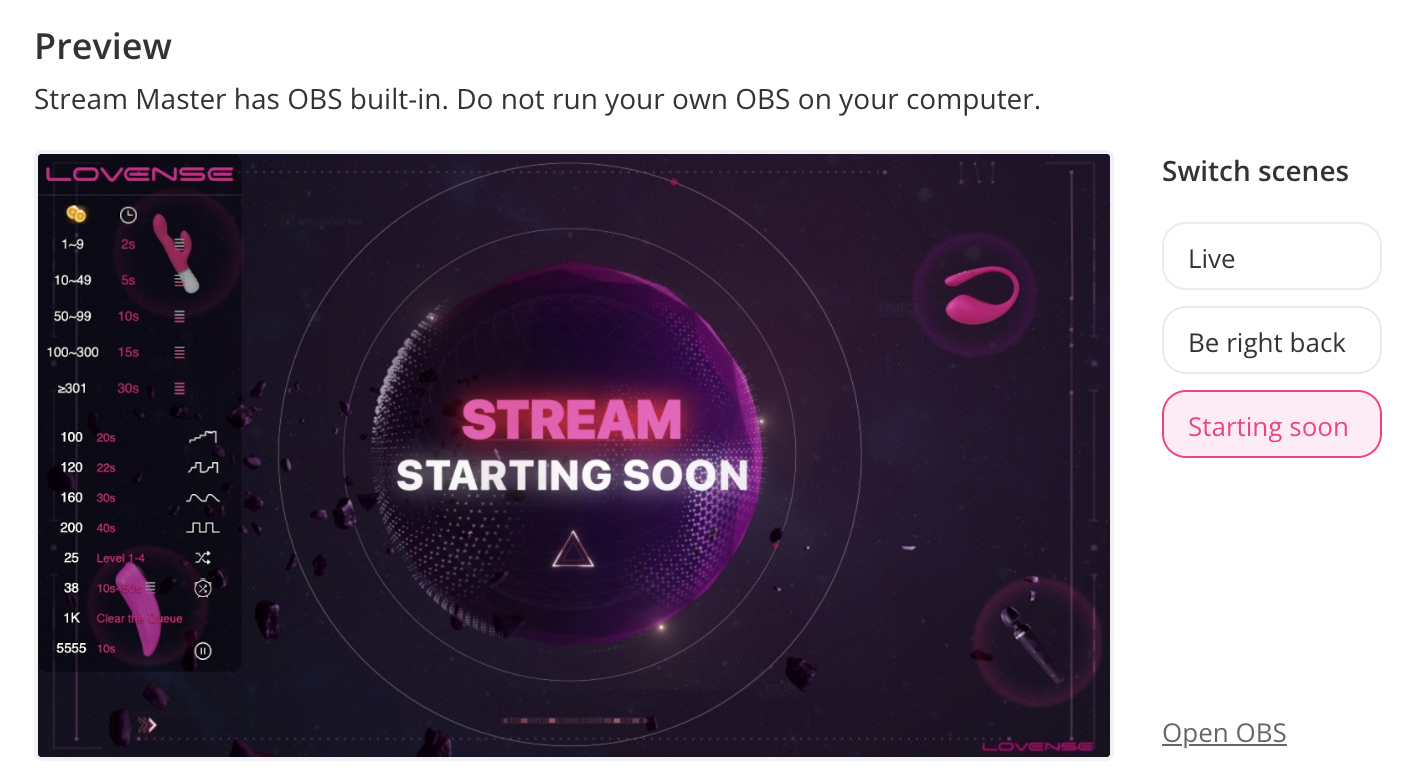
- By default, the “Multi-Streaming” window will already be docked inside OBS.
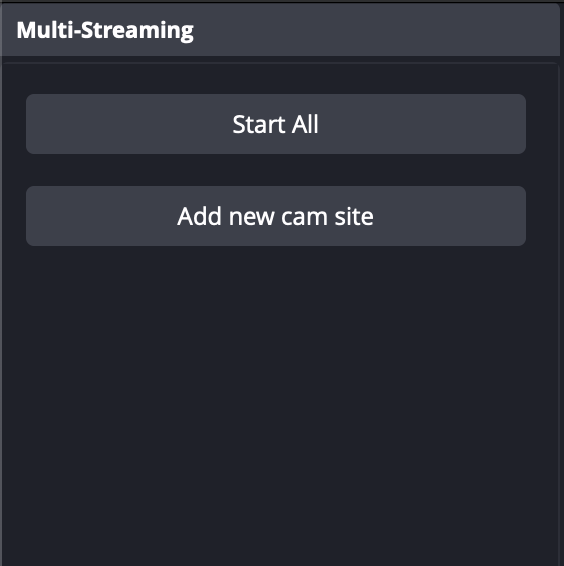
- Click “Add new cam site” and enter your streaming platform details.
- If you want to customize settings or stream different scenes, refer to the OBS Multi-RTMP plugin documentation above.
SplitCam provides an easy way to stream to multiple sites without complex setup.
# How to Set Up SplitCam for Multi-Streaming
- Click on the “Stream Settings” menu in the top right.
- Click the “Add Channel” button at the bottom.
- Select an existing site or enter a custom RTMP URL.

Note: SplitCam is the least customizable option among multi-streaming tools. While it’s easy to use, you will stream the exact same video feed to all platforms without per-platform scene switching.
# Troubleshooting Streaming
First, visit Cloudflare’s Speedtest to check your internet speed.
For smooth streaming, aim for:
- Ping: Under 60 ms
- Jitter: Under 10-15 ms
- Upload Speed: At least 10 Mbps (See Streaming Guide for a better overview of values)
# What is Network Jitter?
Network jitter refers to the fluctuation in your connection’s response time, causing choppy streams and lag spikes.
To check for jitter:
- Look at the jitter value in your Speedtest or Bufferbloat test.
- Alternatively, use PingPlotter (Free trial) to measure network stability.
If your jitter is too high or you’re experiencing packet loss:
- Switch from Wi-Fi to a wired Ethernet connection.
- Restart your router and modem.
- Packet loss of 2-3% will start to moderately impact your streaming quality.
- Contact your ISP if packet loss exceeds 5%.
# Improving Your Stream Stability
If your connection is unstable or you’re dropping frames, try these adjustments:
- Set your
Bitratebetween 2500 - 8500 Kbps (under “Output” settings). - If you currently stream at 60fps, consider lowering it to 30fps for better stability.
- Switch your encoder to x264 (Software Encoding), as hardware encoding can sometimes cause issues.
- Use Advanced settings and set the Keyframe Interval to 2 seconds.
If problems persist, the issue may be outside your or Joystick’s control, such as network congestion or ISP limitations.
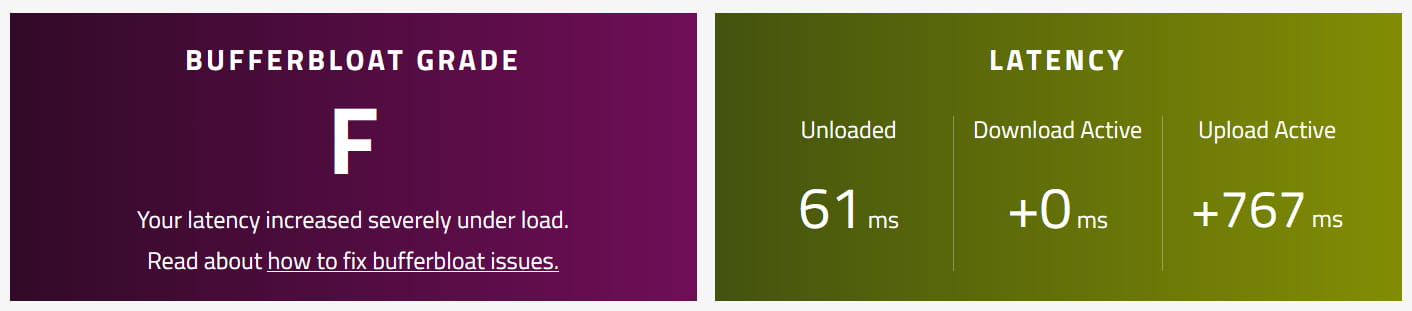
Visit Waveform’s bufferbloat test.
Bufferbloat occurs when your internet connection slows down or becomes unstable due to excessive buffering in network devices. Think of it like a traffic jam, where data packets are delayed or dropped before reaching their destination.
Bufferbloat significantly impacts internet performance, causing lag and slower speeds. One effective way to reduce bufferbloat is by enabling the Quality of Service (QoS) setting on your router. After enabling QoS, run the bufferbloat test again — your results should show improvement.
Note: Enabling QoS may show a lower upload speed than expected. This is normal — the adjusted speed represents a more stable and realistic bandwidth for everyday use.
Bufferbloat often occurs because internet service providers (ISPs) “oversubscribe” their networks, meaning they sell more bandwidth than they can reliably provide. This is why ISPs advertise speeds as “up to X Mbps”—your actual speed fluctuates based on network congestion.
When interpreting Waveform’s bufferbloat results, check the latency grades (ranging from A to F). For optimal performance, aim for an A or B grade. Lower grades indicate network congestion issues, suggesting you should fine-tune your QoS settings or contact your ISP for further support.
Network jitter and packet loss can cause choppy streams, lag spikes, and inconsistent performance.
To check for jitter:
- Check jitter under your
Speedtestresult, orBufferbloatresult. - Alternatively Try Pingplotter (Free trial) to measure network stability.
- Aim for jitter under 10ms - 15ms for smooth streaming.
If packet loss is an issue:
- Switch from Wi-Fi to a wired Ethernet connection.
- Restart your router and modem.
- Contact your ISP if packet loss exceeds 10%.
Jitter and packet loss are often caused by unstable network conditions or ISP issues.
Firewalls and network restrictions can block streaming services.
To troubleshoot:
- Check Windows Defender & third-party firewalls for blocked ports.
- Ensure router firewall settings aren’t overly restrictive.
- Whitelist streaming services in your firewall settings.
If you’re behind a strict ISP firewall, a VPN or contacting your ISP may be necessary.
Dropped frames can happen for a few reasons, including low upload speeds or bufferbloat issues. To start troubleshooting, make sure you’ve completed both the Speedtest and Bufferbloat tests provided in the previous sections.
Windows users can also check for network routing issues using the tracert command:
US Servers:
    tracert live.joystick.tv

EU Servers:
    tracert eu.live.joystick.tv
This command checks each server (“node”) your data passes through on the way to Joystick’s servers. If you see results like *40ms * ** or * 49ms 44ms, this suggests a possible issue with that specific node or network provider.
Unfortunately, if a node has an issue, only the provider responsible for that node can fix it. The best option is to wait for them to resolve the issue.
Important: Some nodes intentionally refuse to respond to ping requests, displaying timeouts (* * *). This is normal and doesn’t indicate a problem unless you also see high latency spikes.
⚠️ Do not share your tracert results publicly. The first few nodes often reveal your router, ISP, and IP address, which are private details.
Skipped or missed frames occur when your streaming software (e.g., OBS) struggles to encode or render video smoothly. This is usually caused by hardware limitations, high CPU usage, or demanding settings.
To reduce missed frames:
- Lower your resolution: Reduce stream output (e.g., from 1080p to 720p) to ease the workload on your CPU/GPU.
- Adjust your framerate: Lower from 60fps to 30fps for smoother encoding.
- Switch encoders: Try switching between software encoding (x264) and hardware encoding (NVENC, AMD HW, QuickSync) to see which performs better on your system.
- Monitor CPU usage: If CPU usage is consistently above 80%, lower encoding settings or close unnecessary programs.
- Update drivers: Ensure your graphics drivers and streaming software are up to date.
After making these adjustments, restart your stream and monitor performance to see if the issue improves.
Still having issues? Try Support Channel on Discord, there are many people willing to help.
# Lovense Integration
Joystick has native support for your Lovense devices. These are interactive sex toys that will vibrate when someone sends you a tip during your live streams. The strength and length of vibration is controlled by you through the Lovense toy settings, and these values correlate to a tip amount.
Add an extra level of interaction with your community during live streams by connecting your toy and encouraging users to tip!
You can also visit the Lovense website guides for the most up-to-date information.
There are several ways to integrate a Lovense device with Joystick. With multiple components involved, it can seem confusing at first. Here’s a step-by-step overview of how it works:
-
Connecting Your Device: Your Lovense toy connects via Bluetooth, either to your mobile phone using the LovenseConnect app, or directly to your PC using a Bluetooth dongle adapter with the Lovense Connect desktop app.
-
PC Lovense App: Your PC needs to run a separate Lovense application (either Stream Master or the browser extension “Share Link”) to communicate with the Lovense servers.
-
Browser Detection: Your browser must be on the Joystick Publisher Page, where it will detect the Lovense browser extension (from Stream Master or Share Link). When successfully connected, you will see an indicator like this:
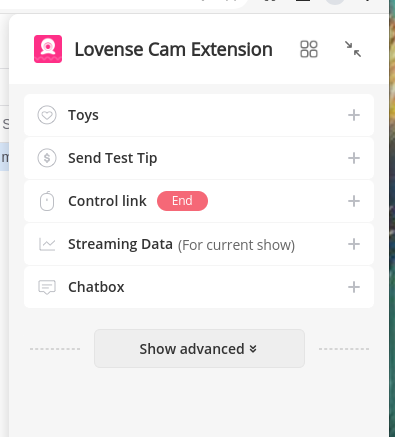
- Sidebar Indicator: Alternatively, you might see a sidebar pane confirming your device is connected:
- Live Interaction: When live streaming, if a viewer sends you a tip, Joystick will transmit the tip amount to the Lovense browser extension. This information is sent to the Lovense servers, which then relays it to your Lovense Connect app (on mobile or desktop), triggering the toy.
Lovense Stream Master is an AIO (all-in-one) software program that combines OBS and Google Chrome into a single application with full Lovense integration. Using this app means you don’t need a separate browser or streaming software, and all Lovense OBS overlays are preconfigured.
- Start by reading through these guides to install: read more
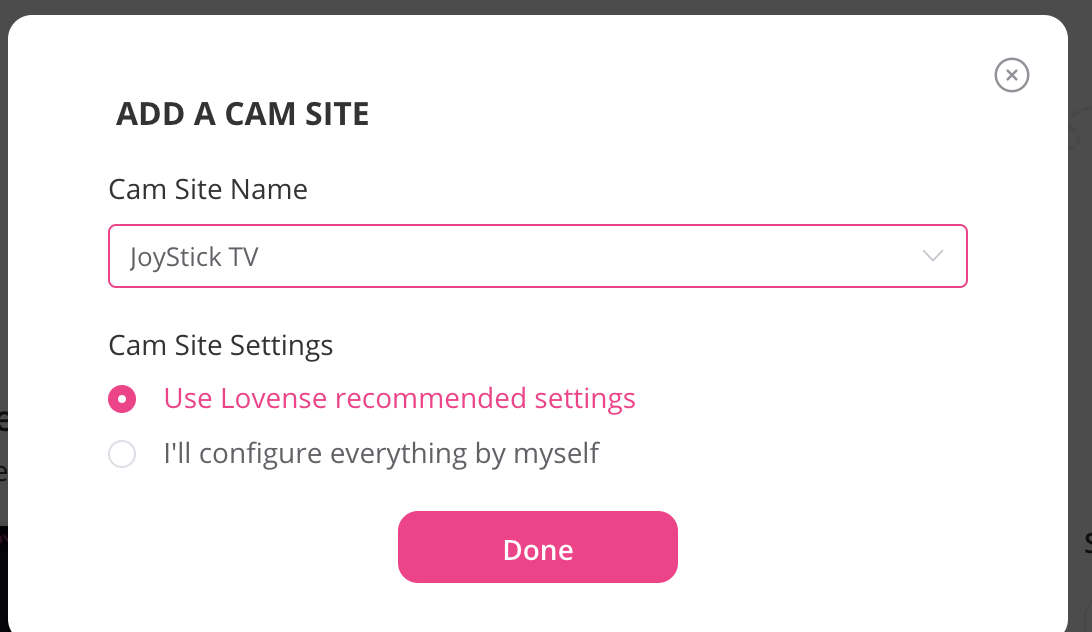
- Next, add Joystick as a cam site. Click the “Add a cam site” button on Stream Master, then search for Joystick.
- Lastly, set up your OBS connection by following our previous guides above: read more
At this point, you should have everything connected.
Visit the Lovense Extension Settings site from a Chromium-based browser (Chrome, Brave, OperaGX, Edge).
NOTE: If you visit this link from Firefox or Safari, you’ll see a blank page. Be sure to use Chrome or a Chromium-based browser.
Once you have logged into your Lovense account, you’ll be prompted to install the “Share Link” extension. You can also find instructions on the Lovense Cam Extension guides.
# Troubleshooting Lovense
If you’re still seeing issues with the device connecting, here’s a few tips you can try.
- Try turning the toy completely off and back on again.
- Give the Joystick Publisher page a “hard refresh” (
ctrl-shift-Ron Windows, orcmd-shift-Rfor Mac). - Ensure your toy battery is charged over 50%
- If you’re using the dongle, try using your phone
- If you’re using your phone, change the sleep settings to keep it on
- Ensure your Stream Master or Share Link and the Lovense Connect apps are all fully up-to-date
After trying these, if you’re still having issues streaming, join our Discord, and let us know in the Support channel.